Wednesday, September 29, 2010

Bag Lady

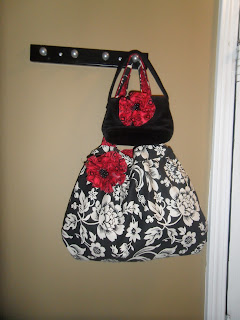
Today was the deemed Bag Day!! I bought this fabric weeks ago and couldn't figure out how to make a purse, till it hit me while lying in bed. I wanted a pleated purse, just had no idea how to accomplish it. I think my first stab at it was pretty darn cute. Gabie loved helping with the flower so much that I added one to her purse that I found at a thrift store for $1.

Here is my finished purse with Gabie's
 On to my next bag....the grocery sack holder (or in my house the diaper trash bag holder)

Three bags in one day, makes it Bag Day!

Tuesday, September 28, 2010

For the Love of the Game

This past weekend my husband and I were fortunate enough to score my in laws seats to the UT vs UAB game. The in laws watched the children while we headed to Knoxville for an adult weekend free of the word "Mommy". If you've never been to a UT football game, you should really head out sometime....they have the some of the craziest fans, and I love the tradition of it all.
I didn't want to wear my same old Tennessee shirts, so off to the sewing room I went to whip out a little tshirt makeover. I thought even if this comes out tacky, I bet their will be someone else just as tacky as I am (plus I packed a backup just in case it was a bomb). 


Here is my UT tshirt makeover, I got lots of compliments at the game .


I think I may have went a little overboard with all the flowers, but I had fun. I took pictures and will try and get around to a tutorial sometime this week.

After being away from my sewing room for a few days, I went in and finished up some Fall outfits for the girls. Gabie is in to skirts these days, she picked out the leg warmers (which were some adult socks I found at Target and cut the feet out of)


For Reese, I decided to make a peasant dress. I am happy with the outcome. 


Then my cousin called and told me her niece was born (we were waiting on the baby's name for embroidery). So back to the sewing room--not that I need an excuse. I had visions of this pillowcase dress with a ruffled hem line and flower applique (from SWAKembroidery). I love the way it turned out.

Too bad it is getting cold, otherwise, I can just see my girls in one of these!

This has been my week so far, and it's only Tuesday night...what will be next?

Thursday, September 23, 2010

Wholesome Baby's

I have been working hard this week to stock up the freezer with baby food...everyday cranking out two to three bags (on top of everything else I am trying to accomplish...I'm a bit ambitious). For babyfood recipes and ideas I refer to the Wholesome BabyFood Site.


So this morning I had the pleasurable experience in feeding Reese her first helping of blueberries and she loved it!

BEFORE

AND AFTER

Man it sure was messy, but it was all worth seeing her woof it down!
So off to the bath we go, with Big Sister in stride loving that Reese got dirty! Cause' now they both get baths.


Not a very exciting day with the girls, but I was just trying to spend a few moments with them before their weekend at Granny's.  Gabie is very excited for it all, she keeps wanting to call Buster and Bandit (their dogs) and tell them she's coming to visit. She never ceases to make me laugh.

 Now off to sewing up the rest of the cornhole bags for the
 Blackman Girls Basketball 1st annual Pancake Breakfast and Cornhole Tournament.

GO BLAZE!!

Tuesday, September 21, 2010

Homemade Fabric Labels


What's this you ask?

Yes, Mam! Those are my new fabric labels...Hot off the press! Yes you can buy those expensive sheets for printing, but this was done all with items that I already had at the house. Waiting on my ink to dry then will soak in a vinegar bath to make ink set then off to the hair dryer to make permenant. I was thinking this would be much better for everyone that had to label items for school and daycare, you could add a little heat and bond to the back and iron it on (just a thought). Let me know if anyone wants instructions, they were really easy.

Had to share my label on the product!

Monday, September 20, 2010

NO SEW Fabric Flower Headband

Kicking it off with a No Sew Tutorial. I want to warn you that they are really easy and Super cute on all those CuddleBugs (or yourself) in your life. This one is Gold and Black so my daughter looks cute while cheering on those Vanderbilt Commodores!

Supplies: Scraps of any color Silky Material, scissors, pen (I use a fabric pen), candle, hot glue gun, button or beads for center, non-slip headband, felt for backing.


First off I took one of my circle templates to measure out my first circle (you can also use a cup).


I cut that first circle out to use as a guide for the remaining circles making each a different size. I cut 6 circles for each color to make the two flowers. Here is one completed


I then took each circle and cut small slits around the edge to create petals


Next the Fun Begins. Please exercise caution when working with candles. You use the flame (on your candle) and seal the edges of your circle. I did this with the shiny side of fabric faced down because the fabric tended to curve towards the flame.


Do this with all your circles.


I then cut out two felt circles to back my flowers


Grab your headband and hot glue gun. You want to run a bead of glue on one side of the felt in the center and glue to the headband where you are placing flower. Note that the headband runs in between the felt and flower.


Next glue all  your circles together and add button on top to create your flower.


Glue the finished flower to your felt and headband and Now you have yourself one cute little headband.
This picture is first thing in the morning when Gabie is in our bed watching Mickey Mouse Clubhouse (her a.m. ritual). I will post a picture at our next game.

Friday, September 17, 2010

YEAH!!!

Wow! First off I would like to thank you for dropping by. This whole process has been a crazy one, I have always been creative, my head swims at night and in the morning of things to do and create (it's how I maintain sanity) so...

Let's begin with what is a CuddleBug? A CuddleBug is a little creature that turns your life upside down, that you love with all your heart and soul, who can make your house look as if a tornado has hit it, looks precious while sleeping, keeps you young, makes you crazy, and helps you see what life is all about. The name itself came from a "silly song" that I sang to my first child, that still makes her smile when I sing it.

I have been reading others craft blogs and will now take my own craft adventure....I hope you guys enjoy the ride. I am still playing with ideas of what to officially open with my first tutorial, but for now I must go my two year old wants to color.